Friday, September 13, 2013

OpenTeacher: Improve Your Foreign Language Vocabulary Skills

OpenTeacher is an opensource application that helps you learn a foreign language vocabulary. Just enter some answers and questions in your native and foreign language or download them from internet, and OpenTeacher will test and let you know your vocabulary test result.
OpenTeacher will help you to learn what you need to know for your next test. Also it allows you to make use of a lesson type where you are being teached in small parts. Once you know one part, OpenTeacher moves on to the next. This should help you remember large doses of information without being overwhelmed by it’s size.
You can also be tested by OpenTeacher. It will test you and keep track of your progress and tells you how much you know. By this way you can make sure yourself that you know enough to pass your next test.
OpenTeacher has integrated with the online language tutor Wrds. So that you can access, edit and learn all your Wrts lists directly from OpenTeacher, or add new lists that you’ve created in OpenTeacher. This way you can use the same lists wherever you go.
OpenTeacher not only focused on students, also helps teachers to give their students the right education. While teachers still provide the information, OpenTeacher can help the students learn this information by themselves. It improves the student’s results and saves the teacher time.
Features
- You can view both recent and past results of tests with graphs.
- It offers read support for more than 29 file formats and write support for over 14 file formats.
- You can learn typing with Typing Tutor provided by OpenTeacher which adapts itself to your skills.
- Smart question asking and interval training.
- Think answer, shuffle answer and repeat answer input modes.
- Easy symbol, Greek and Cyrillic input.
- Read and write T2K (Teach2000), wrts and read ABBYY Lingvo Tutor files.
- Save and open your online WRTS lists.
- Print your word lists, media items and topography maps.
- Available in Arabic, Trad. Chinese, Croatian, Danish, Dutch, English, French, German, Hebrew, Hungarian, Japanese, Korean, Polish, Russian, Serbian, Slovenian, Spanish, Swedish and Turkish.
Install OpenTeacher On Ubuntu/Linux Mint
OpenTeacher is found in the Ubuntu official repositories. So install it using the following command.
$ sudo apt-get install openteacher espeak
Launch OpenTeacher
Open it up either from your Menu or Dash. The default interface will look like below.
OpenTeacher_001From here, you can create new words, media, topography lessons or you can directly import from WRDS or from your local disk.
Create Sample Lesson
Click on the “New Words lesson” button. Enter the title for your lesson. Enter the source language in the Question language column, in my case it’s English and enter destination language (foreign language) in the Answer language column, in my case it’s Spanish. And enter all the words that you want to learn from the right side word table. You can switch to next question or answer column by pressing tab key or “=” symbol from your keyboard. For testing purpose, I’ve given two words “Hello” and “Welcome”.
OpenTeacher_003Now Click on the “Teach me” button. In the next window Click “I’m ready, start the lesson” button.
OpenTeacher_004Now OpenTeacher will ask you the questions one by one that you’ve entered in the first step. Enter the answer in the “Type answer” column and Click Check.
OpenTeacher_006If your answer is correct, it will ask you the next question, else OpenTeacher will show you the correct answer or the difference from the correct answer. Once the test is completed. The OpenTeacher will display the result and let you know how did you perform in the test.
OpenTeacher_007By this way, enter complex words in your native and foreign languages and start learning! Note that OpenTeacher is not a language converter and translator.
- See more at: http://www.unixmen.com/openteacher-improve-foreign-language-vocabulary-skills/#sthash.NWWmp7IC.dpuf

Thursday, September 12, 2013

Setup mibew-messenger

Mibew Messenger, also known as Open Web Messenger, is an open-source live/chat support application written in PHP and MySQL. It enables one-on-one chat assistance in real-time directly from your website. Just place the Mibew Messenger button at your site, the visitors of your site will be able to get assistance from your operators, technical support executives and customer support executives who help them by clicking on the chat button.
Features
- Visitors can do real-time chat without page refresh.
- Unlimited operators, chats, and users.
- Unlimited departments (groups of operators).
- Priority queue of visitors.
- Localized to 10+ languages, unicode support.
- Runs on your server and domain.
- Complete free and Open source.
For complete feature list visit here.
Prerequisites
Your server should have installed with following prerequisites.
- Apache webserver
- PHP (5.x and above) with MySQL support
- MySQL 5.0 and above
First you have to install and configure LAMP server. Visit any one of the following links to setup LAMP server.
Create Database and User for Mibew
For instance, here i am going to create a database called “mibewdb” and database user called “mibewuser” with password “centos” for ProcessWire. You can define database and user as per your liking.
# mysql -u root -p
Enter password: 
Welcome to the MariaDB monitor.  Commands end with ; or \g.
Your MariaDB connection id is 3
Server version: 5.5.31-MariaDB MariaDB Server

Copyright (c) 2000, 2013, Oracle, Monty Program Ab and others.

Type 'help;' or '\h' for help. Type '\c' to clear the current input statement.

MariaDB [(none)]> create database mibewdb;
Query OK, 1 row affected (0.02 sec)

MariaDB [(none)]> GRANT ALL ON mibewdb.* TO mibewuser@localhost IDENTIFIED BY 'centos';
Query OK, 0 rows affected (0.01 sec)

MariaDB [(none)]> flush privileges;
Query OK, 0 rows affected (0.00 sec)

MariaDB [(none)]> exit
Bye
Adjust Firewall/Router Settings
Allow the apache default port “80″ through iptables/router. Edit file /etc/sysconfig/iptables,
# vi /etc/sysconfig/iptables
Add the following line.
-A INPUT -p tcp -m state --state NEW --dport 80 -j ACCEPT
Now restart the iptables service.
# /etc/init.d/iptables restart
Getting Mibew
Download the latest version here or just enter the following command to download it from your terminal.
# wget https://sourceforge.net/projects/webim/files/Mibew%20Messenger/1.6.5/mibew165.zip --no-check-certificate
Create a directory called “mibew” under web root folder i.e /var/www/html/.
# mkdir /var/www/html/mibew
Copy and unzip the mibew installation file in /var/www/html/mibew/ folder.
# cp mibew165.zip /var/www/html/mibew/
# cd /var/www/html/mibew/
# unzip mibew165.zip
Configuration
Set privileges to mibew directory with command:
# chown -R root:apache /var/www/html/mibew/
Edit file config.php file,
 # nano /var/www/html/mibew/libs/config.php
Set your mibew application path i.e the folder name under web root directory. In my case it is /var/www/html/mibew.
So my configuration will be:
$webimroot = "/mibew";
Enter the MySQL details as shown below.
 *  MySQL Database parameters
 */
$mysqlhost = "localhost";
$mysqldb = "mibewdb";
$mysqllogin = "mibewuser";
$mysqlpass = "centos";
$mysqlprefix = "";
Save and exit the file.
Begin Installation
Open up browser and go to to URL http://domain-name/mibew/install or http://ip-address/mibew/install.
If everything seems ok, the following screen should appear. Click Create required tables link.
Installation - Mibew Messenger - Mozilla Firefox_001After successful installation, the following screen will appear.
Installation - Mibew Messenger - Mozilla Firefox_002Now you will be able login to chat as user admin with empty password. For security reason set the password immediately and remove the /mibew/install/ folder.
# rm -fr /var/www/html/mibew/install/
Now click on the Proceed to Login page and login as admin with empty password.
Login - Mibew Messenger - Mozilla Firefox_003In the next page you will be asked to create your administrator login password and email as shown below.
Operator details - Mibew Messenger - Mozilla Firefox_004Finally, this is how your administration console page looks.
Home - Mibew Messenger - Mozilla Firefox_005From here, you can
- create/delete operators,
- find the waiting users,
- Search chat history,
- View the chat statistics,
- Setup common system behavior and chat options,
- Change administrator profile details and so on.
How do i add the chat button on my website?
It’s very simple. Go to the Mibew admin console. You will see a link called button code in the middle of the admin console window. Open the link in the new window and copy the HTML code and you can paste them in your website at any place.
Button HTML code generation - Mibew Messenger - Mozilla Firefox_006You can change the chat image using Choose image button and can change the chat window style as well.
- See more at: http://www.unixmen.com/setup-one-one-chat-directly-website-mibew-messenger/#sthash.u6ijnA0M.dpuf

Sunday, September 30, 2012

How to fix your discrete GPU temperatures

During summer sessions, computer hardware is getting seriously hot and needs our attention. The most common problem causing artefacts into your screen is due to overheated graphics cards. Either passive (without fan) or active (with fan) cooling, the optimum results stem from the best fit between your GPU processor’s surface and its heatsink. Thus many heatsinks are nickel-plated with a copper base block, or fully copper-plated if you pay some extra money.


Why copper? The answer is simple; it improves heat conduction and offers better cooling efficiency than the other common metals, such as aluminum or nickel. Furthermore, there is a tendency nowadays to use exotic shaped and bulky sized GPU coolers with several heatpipes; they quickly conduct heat from the chip’s surface to protect it from overheating during stressful situations. Personally, I prefer the watercooling solutions in combination with little ramsinks rather than buying a huge cooler limiting my case size and probably harming my tower’s airflow (and maybe its overall ambient temp).

In case you monitor your card’s temperature and notice that it exceeds 85 Celsius (under load –  playing a game or running a stressful 3D application) then you have problem. Before it’s too late, you need to provide a sufficient cooling mechanism to your hardware, in order to operate under normal conditions. But if you think that your cooler is sufficient enough, then please try to replace the thermal paste. All GPUs are coming with low quality pre-applied TIM (thermal interface material), and this is what we are going to replace in the next paragraph.
First things first, you need to remove your card’s plastic body using any clips (look around the corners) or little screws. Here it’s my old NVidia GeForce GTX 465 manufactured by ASUS Technologies.
Okay, now you need to find a way to remove the heatsink. In most cases there are 6-8 screws that hold the heatsink above the GPU processor. Use a screwdriver and remove the heatsink carefully without scratching anything on the PCB.
As soon as you remove the heatsink, you will see your card’s GPU processor, hidden under the very centre of the heatsink. As you can see, ASUS uses here a direct heatpipe cooling system, which means that the heatpipes indirectly transfer the heat through the fins and finally the big surface manages to dissipate the GPU heat successfully through the fan.
Use a soft paper and highest percentage alcohol or Artic Clean in order to clean all the pre-installed TIM. Then, apply the thermal grease (eg AS5 or Ceramique) onto the surface of the GPU processor. After this, your chip should look like this:
Before putting the cooler back on the GPU processor, take this advice and use a hairdresser to heat the copper-plated base of the heatsink. Of course, there isn’t any reference inside the manual that advises you to do that, so act independently. Let’s say that this is my personal step in this procedure so far.
Now place carefully the heatsink in the very center of the GPU processor. Insert the necessary screws through the mounting holes so as to slide the washers onto them. Before moving on, make sure that all screws are both fastened well, although it’s important not to screw them massively tight.
Final step is to place back the plastic body and fasten any clips that holds it on top of the card.
Okay, now you ‘re ready to test your little achievement. Plug your GPU back to your motherboard and start playing a game in order to put your graphics card under stressing situation. Simultaneously, please monitor your GPU temperatures (using lm-sensors) and after a couple of hours of gaming, see the log files. Normally, there will be a delta temp of -5 Celsius than before.

However, if you GPU is still hot then you need to check the fan. Many Linux drivers are not able to operate successfully the cycle fan duty, thus PWM technique fails. The best thing here is to try both available drivers for your GPU model, meaning open-source and proprietary version. In worst case scenario, you need to manually setup thermal thresholds and fix your cycle duty. For example, a rule would be: “if GPU temp exceeds 70C then put its fan at 80% RPM”. Try different combinations and see what works best for you. For example, trying 100% cycle duty is very loud and noise, so do not overestimate, because you will end up with a headache.

Piwik – Open Source Web Analytics

Piwik is a free to download and use open source web analytics tool that gives users full control of their data. It is a great OS alternative to the widely used Google Analytics that is more prone to unwanted data sharing with advertising companies.

Installing

Piwik is PHP MySQL software which you download and install on your own webserver. This way you are given full control of your data, unlike remote-hosted services. The installation is simple and quick to do.
To install Piwik you simply download the latest release, unzip and upload the contents to the desired location on your web server using your FTP client. After the uploading is done you can open your web browser and navigate to the location that you uploaded Piwik. This will display the welcome screen and the installation can now begin.
Piwik will check that the minimum requirements are met and if it finds any problems it will suggest a possible solution.
  
After that you setup the MySQL database, create a super user account and connect the first website that you want to track (you can track many different websites). You are then given a JavaScript Tracking Tag that you must include in every page that you want Piwik to analyse.
You will find a comprehensive and more detailed installation guide inside the downloaded file.

Analytics Data

So what can Piwik show us? Actually is can show almost everything you will ever need!
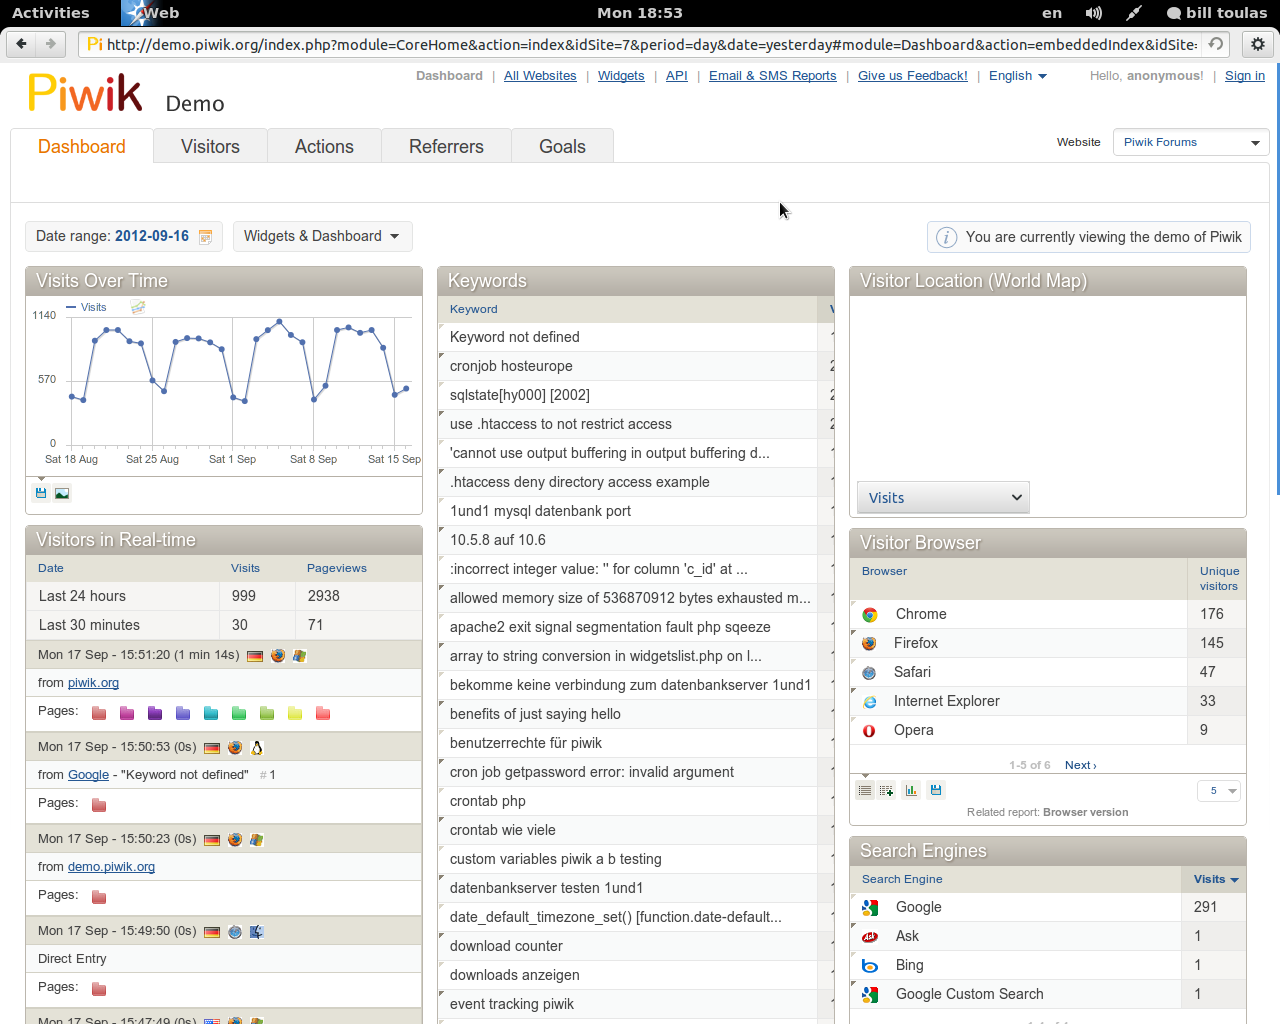
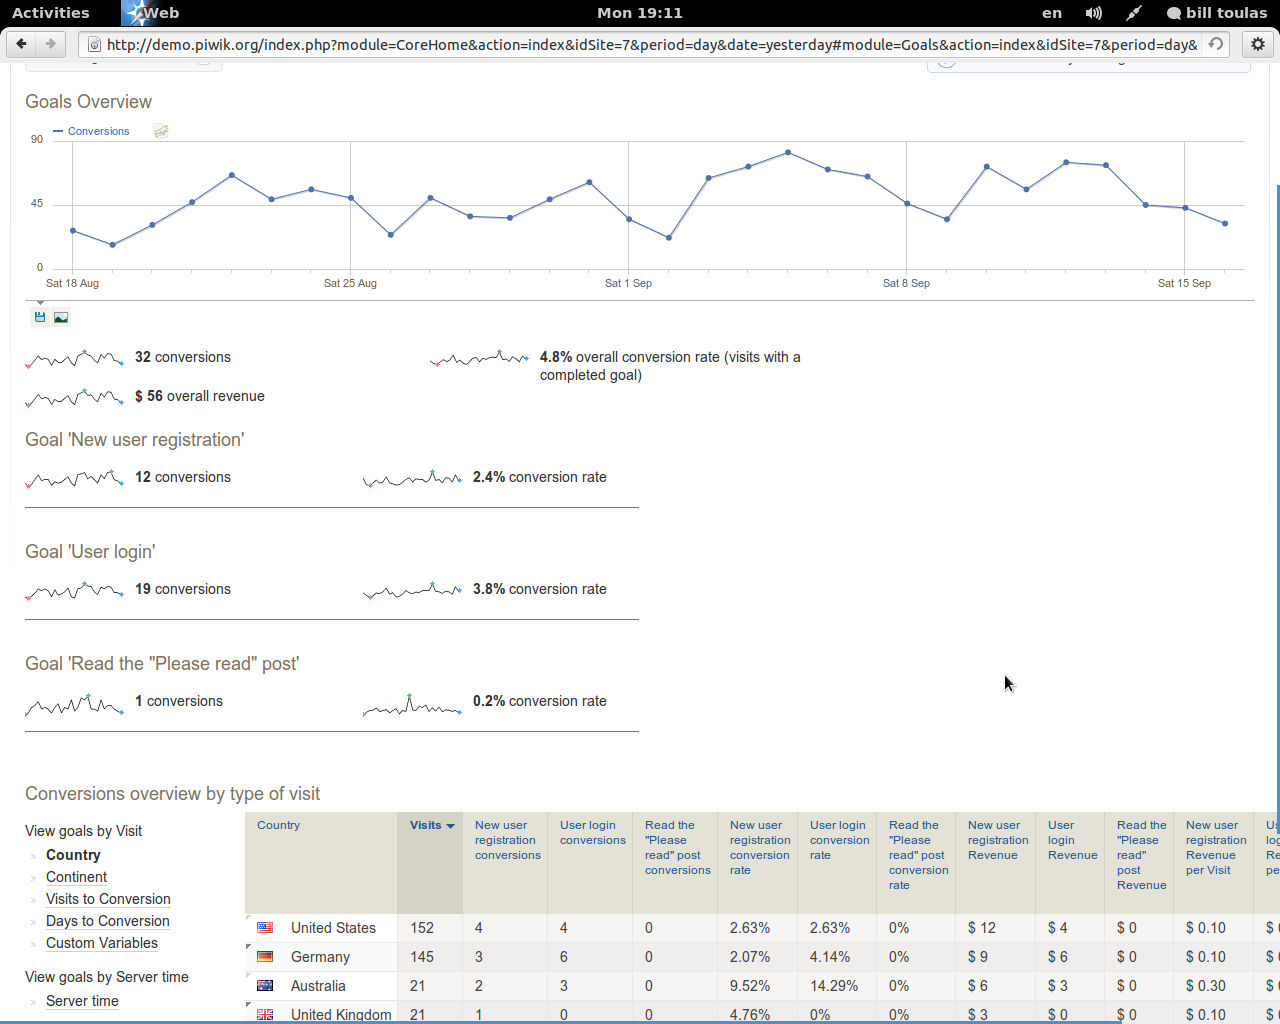
Piwik Data is divided in 5 main categories. The Dashboard, Visitors, Actions, Referrers and Goals. The following screenshots are not from real data but from Piwik’s on-line demo.
Dashboard
In the Dashboard you can get the main idea of what is going on generally in your website. You get general info about were are your visitors from, how many were they for the set time spectrum, the keywords that brought them to your site, Length of visits, search engines used, referrer websites and a real-time visitor counter that gets updated every 10 seconds!
Visitors
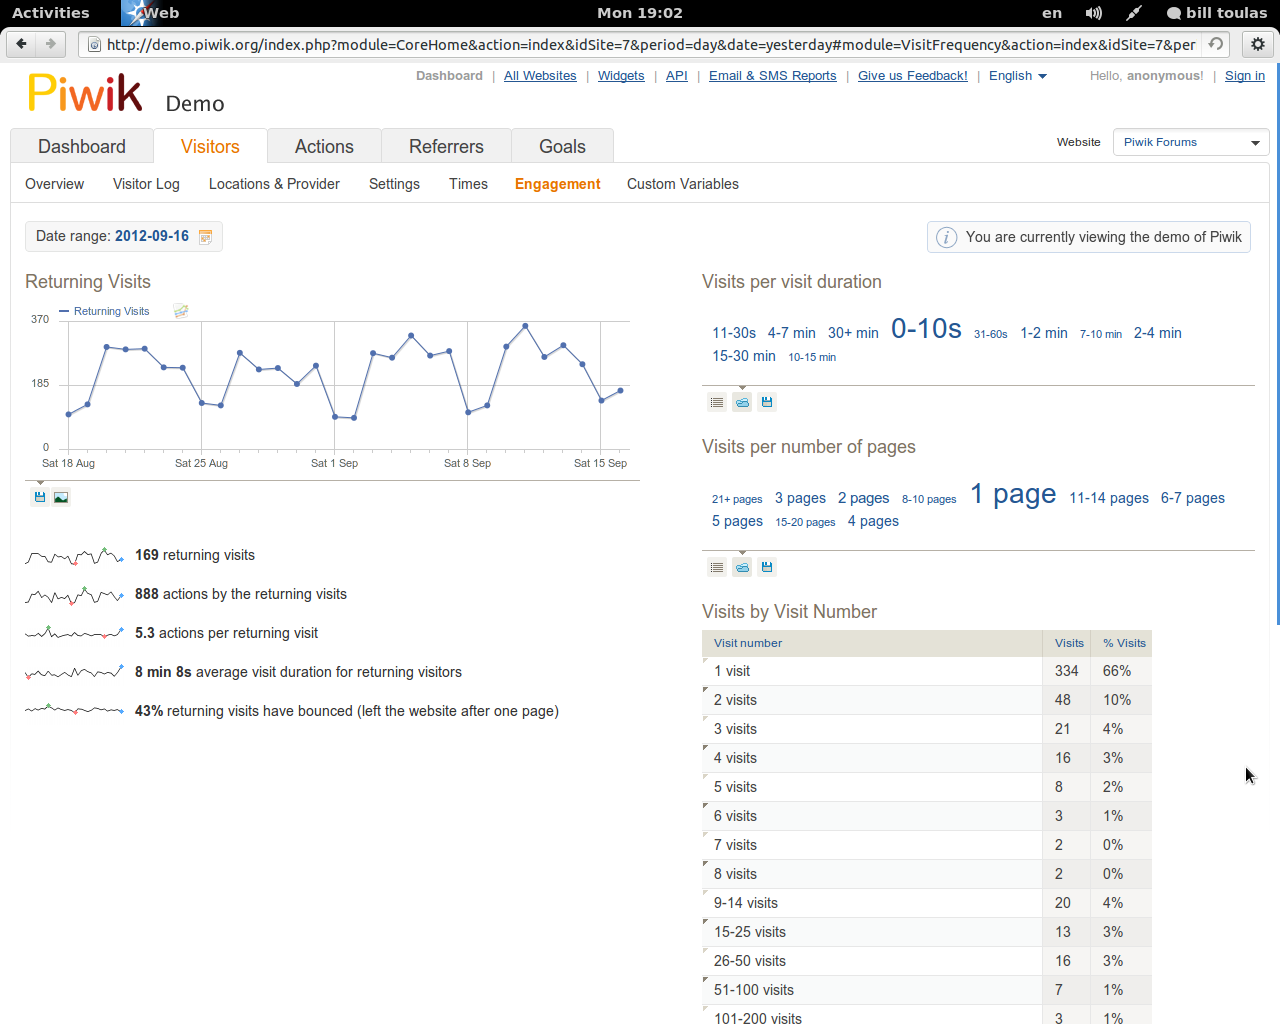
This is maybe the most important tab. Here you can see graphs of the visitors count, their provider, location, what browser and what operating system your visitors are using, what is the resolution of their monitor and what plugins they have installed in their browser.
You can also see visits per local or server time and also check their engagement according to the duration of visits and the depth (pages visited).
Actions
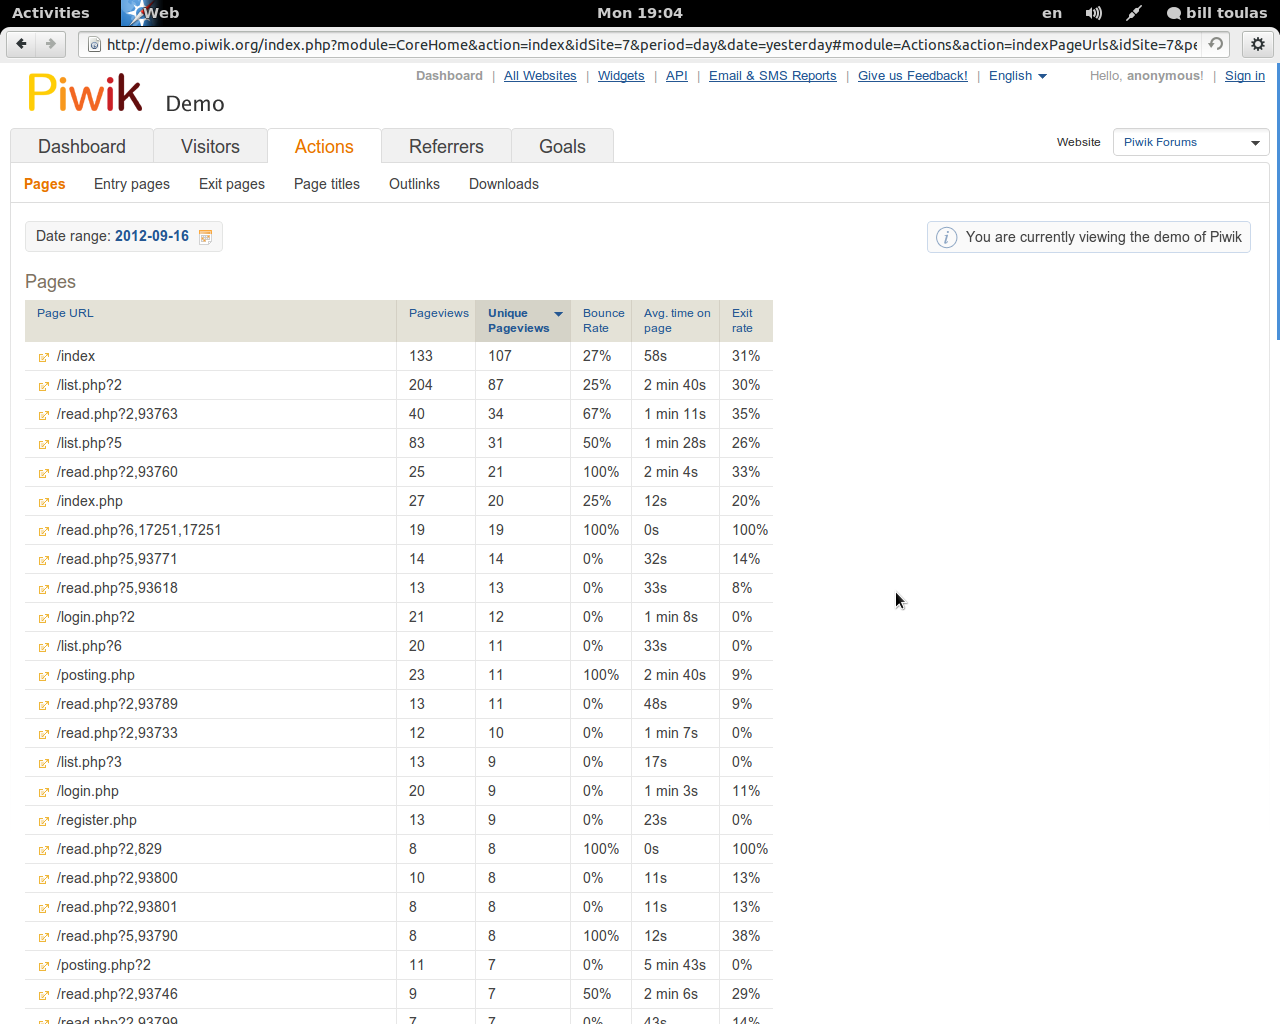
In the actions tab you can view what pages were the most popular and see page views, unique visitors, average duration of visits, bounce rate and exit rate.
Apart from that, you can also check were your visitors went after leaving your website, what links did they click and even how many downloaded content from your website.
Referrers
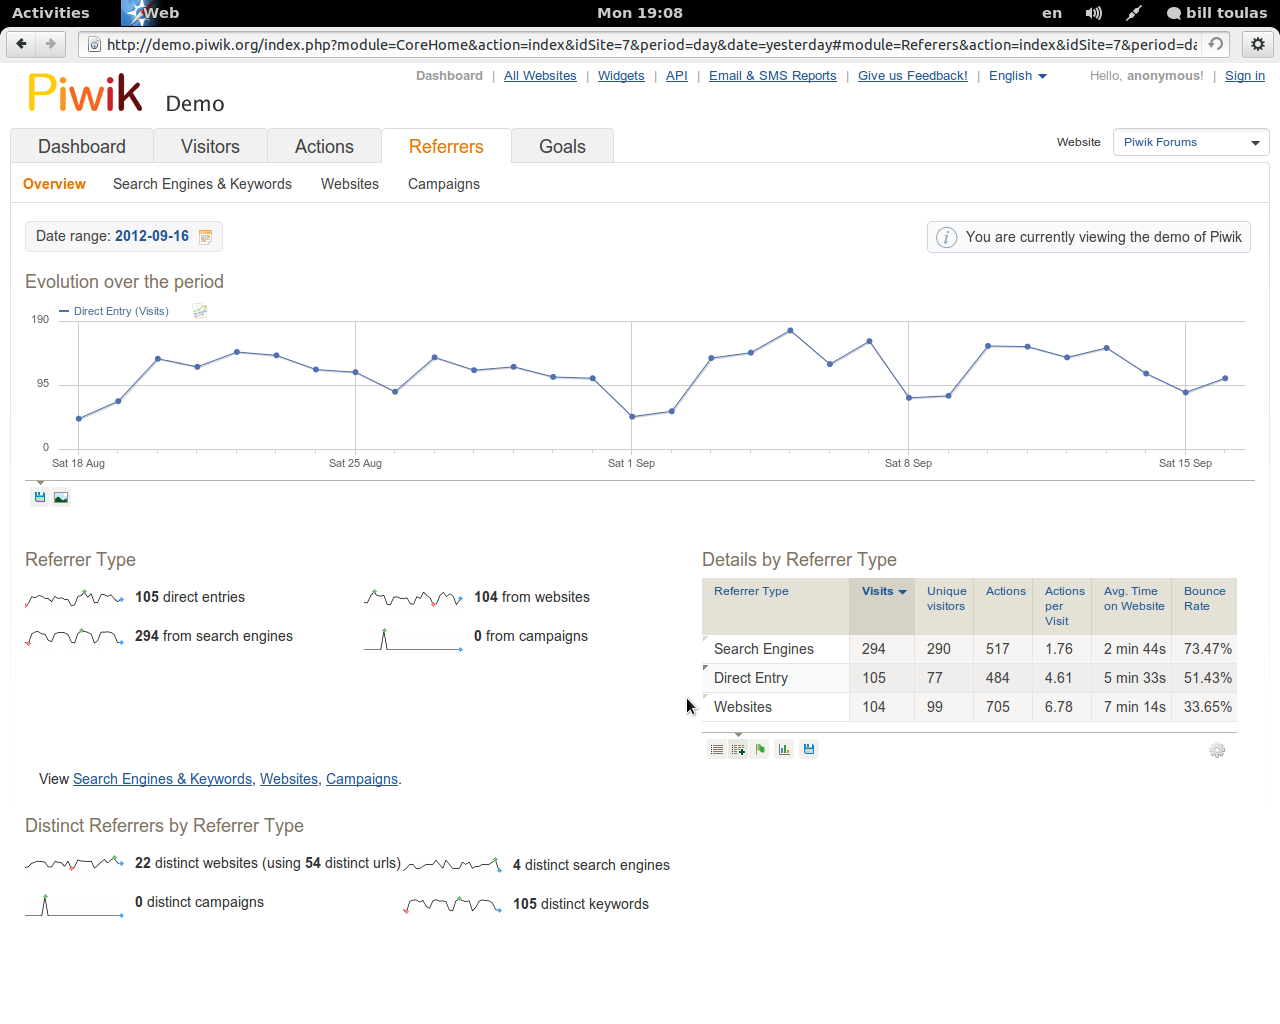
On the referrers you can check how well you are doing with search traffic and visitors from other websites linking to yours.
Goals
The goals tab is meant to be used for tracking how far or close you are according to the pre-set goals. You can see things like log-ins, number of a featured post readers, new registrations and the revenue of course!

Configuration Options

You can configure the Piwik in many ways to bring it to what serves you the best way. This can be done by adding custom plugins, fully customize your Dashboard and drag and drop widgets you want to display, configure Piwik to send you mail reports, enter custom variables, add and manage multiple accounts, configure Piwik to monitor unlimited number of websites, exclude IPs and so much more…

Try Piwik

Piwik is 100% free software that can worthily replace any commercial solution. It is powerful, comprehensive, informative and easy to use. No matter how pleased you are with what you are currently using, you should give Piwik a try. After all, even if you don’t care about open or closed source ideology stuff, it would be useful to have 2 different monitoring tools and see if they agree.
Piwik Website

SolusOS Eveline 1.2 Review

Desktop Usage
One issue that I have come across with some Linux operating systems in the past is lack of ability of properly managing dual displays out-of-the-box. I can gladly say that SolusOS handled everything with ease and I witnessed no dramas during my test time and on a system with only moderate specifications.
SolusOS sits on a GNOME 2.30.2 desktop environment. Although GNOME 2 is beginning to show signs of its age, it certainly doesn’t show in SolusOS. In fact, SolusOS’s polish is so impressive, GNOME 2 feels shiny and new once more. But no matter how much you dress it up, there’s no changing the fact that there will be no more support or updates for GNOME 2. So what the long term decision will be for its inclusion in SolusOS is unknown to me. But I can see the potential for easily converting the desktop to a MATE base. Which really would be not much effort considering MATE’s heritage goes right back to GNOME 2.
The Menu System
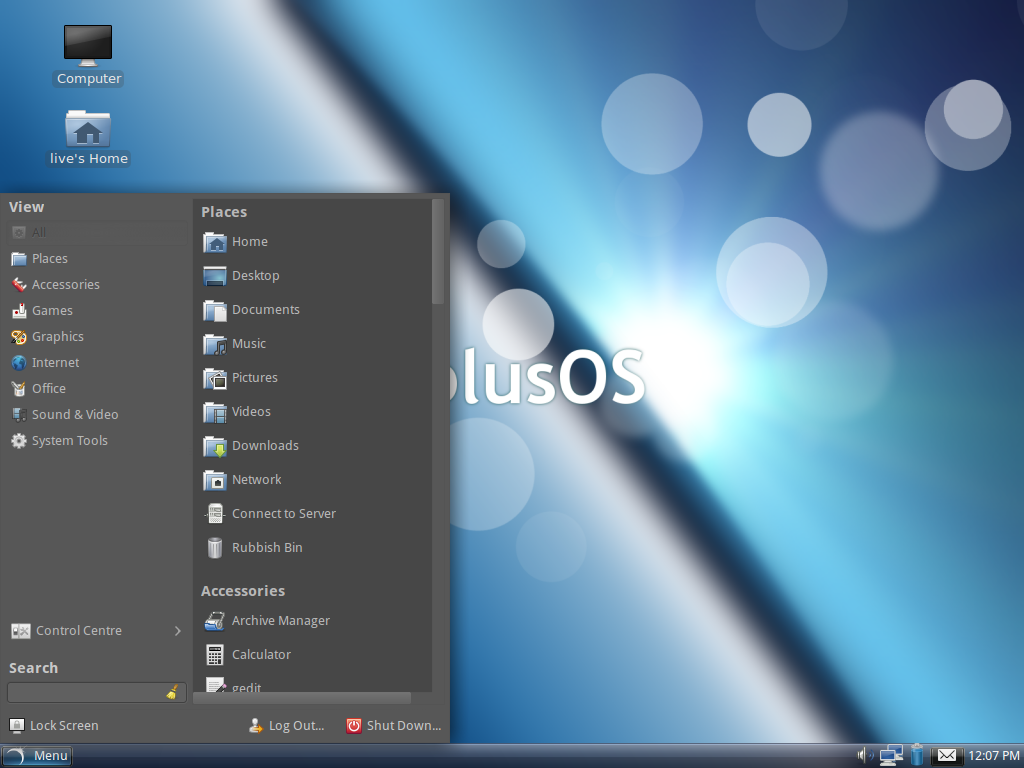
One particular feature that I really enjoyed using in SolusOS was the Main Menu. I don’t know whether it’s a custom version of Mint Menu or something else, but the best way I can describe it is a blend of functionality from Mint Menu and the KDE4 Menu. It’s very functional, responsive and is well designed. It is a pleasure to use and to quickly find what you searching for. Whether it be an application or location on your system.
Package Selection
Software selection was nice. There is a good balance of applications. Most of them bog standard that ship with most GNOME based distributions, but there are some extra goodies thrown in to the mix. PlayOnLinux and WINE add for an extra layer of compatibility. I had time to test out WINE by booting up a quick game of Plant vs. Zombies and it worked a treat. I didn’t really have the time and resources to tinker around with PlayOnLinux. But I did take a quick sneak peek at its GUI and it looks like a very capable package. PlayOnLinux+WINE are a nice addition to have shipped with SolusOS.
Multimedia
There’s a strength and focus on multimedia support with SolusOS. Default packages include VLC Media Player and GNOME MPlayer. And of course there’s also the usual packages you find shipped with almost all GNOME based distribution. Totem and Rhythmbox are both included with the addition of all required codecs. That’s something that always eases the pain for most new users with Linux.
The Missing Piece
When browsing the available and installed applications in SolusOS, I couldn’t help but notice something a little odd. And I have to admit it did bug me a little. Taking the final ISO size into consideration, I expected GIMP to be installed by default. Looking through the menu you’ll find that it’s not. Instead, there is GNU Paint installed. Why GNU Paint has been put in place of where GIMP should be, really, strikes me as not making sense. Unless there is some personal connection with the developers and GNU Paint, I just don’t understand it. Or perhaps it’s just time that I stop expecting GIMP to be installed on every Linux distribution available.
Conclusion
Considering SolusOS comes from a very small development and support team, (in fact, it’s the work of just a few people) there are no signs of this when you use SolusOS. The small development team has done a fantastic job with SolusOS and it’s a real professional Linux distribution that is more than capable of meeting the requirements of even the most demanding Linux user.

Sunday, December 18, 2011

Linux Latest Technologies

Please find the below link for latest and fast growing technologies in linux or unix.You can post forums and comments in this site for upgraded softwares and deveolpments.You can like this using your facebook account for daily updates which were posted in your wall.

http://www.unixmen.com/Link

Wednesday, May 5, 2010

Xampp Server Installation

Steps To Install XAMPP Server in Linux

Go to a Linux shell and login as the system administrator root:
  1. su

  2. Extract the downloaded archive file to /opt:

    tar xvfz xampp-linux-1.7.3a.tar.gz -C /opt

That's all. XAMPP is now installed below the /opt/lampp directory.

To start XAMPP simply call this command:

/opt/lampp/lampp start

You should now see something like this on your screen:

Starting XAMPP 1.7.3a...
LAMPP: Starting Apache...
LAMPP: Starting MySQL...
LAMPP started.

Ready. Apache and MySQL are running.

Just type in the following URL at your favourite web browser:

http://localhost or http://127.0.0.1

Tuesday, February 2, 2010

Difference Between Unix and Linux

UNIX Operating System
A few popular names:

HP-UX

IBM AIX

Sun Solairs

Mac OS X

IRIX

Linux Distribution Operating System

A few popular names:

Redhat Enterprise Linux

Fedora Linux

Debian Linux

Suse Enterprise Linux

Ubuntu Linux

Why Use Linux?

Reason 1: Security

Viruses are less of a threat on Linux. The very way a Linux system is designed makes it very difficult for a virus to function as it does in Windows. This also applies to spyware, malware, etc. The fact that almost no viruses are written for Linux also adds a nicer sense of warmth. Wouldn’t be nice to read the almost endless stream of security holes in Windows and know it does not apply to you?

Reason 2: Updatability

Linux is in a constant state of development and improvement by professional and semi-professional developers who donate their time and skills to the various projects. In addition, the majority of the system and available applications are Open source, so if you wish and you had the ability, you could add any feature you needed. Linux also has the ability to expand the life of many systems as it’s reduced overhead and need for system resources means that it will run great on older machines.

Reason 3: Support

Yes, support. As hard as it is to accept, you can easily get support when you do run into difficulties. In addition to the plethora of online forms, both independant and those provided by the distro supplier, there are also more and more 3rd party service providers that offer service contracts for Linux systems. Good to have in a corporate/business environment. There is also support offered by more and more traditional Technology names such as Dell, IBM, Novell, Sun and others. And finally, for support a little closer to home, most major cities have Linux User Groups that can and do offer help and advice. Help and Support IS available and does not usually mean spending hours on hold to speak to someone in a call center on the other side of the planet.

Reason 4: Self-improvement

Personally, this is one of the most important reasons why I switched. Linux gave me the chance to learn new skills, gain deeper insights into how computers work and provided an excellent platform to develop on. Some people may be satisfied with going through life with blinders on and living the “status-quo”. For those that enjoy the how/what/why of life, Linux is an excellent choice.

Reason 5: Cost

Most people would put this at the top of the list. For me, cost is one of the least important reasons to switch to Linux. However, the cost advantage of Linux is huge. In a nutshell, you get the complete OS, thousands upon thousands of applications AND support for the grand total price of….S0! We’re not talking a watered down, feature deprived OS either…we’re talking a full-blown, complete, enterprise ready OS…for free. “But my time is worth something and the extra effort needed with Linux cost me money.”, alright…and how much does it cost you when Windows bluescreens in the middle of editing a large report that hasn’t been saved? Or how about when a virus or spyware prevents you from even using your system…probably costs you a lot.

Use Linux Commands and Shell Scripts directly in Windows

Did you know that there is a way to run Linux commands and shell scripts directly in Windows? No Linux partition required. No dual boot required. All you need is CygWin, which is available for free at http://cygwin.com.

You can think of CygWin as a Linux emulator that runs within Windows. Technically, it is not an emulator, because it cannot run just any Linux program directly. Programs have to be specifically ported to CygWin first. The good news is that hundreds of such programs are available at your fingertips via the CygWin installer, and yet more are available on the side. So, for all intents and purposes, it really is a Linux emulator.

The best of both worlds: CygWin, therefore, is a great way to learn Linux when no Linux box is available. More importantly, CygWin brings you the best of both worlds, allowing sophisticated, powerful, atomic Linux commands to operate in the Windows world. The number of uses for CygWin are incalculable. This article will briefly explain why CygWin is a good thing and, hopefully, whet your appetite for more. This is only the first of what promises to be a long string of articles that will appear on CodeJacked to tout and exemplify the many uses for CygWin.

Shell Scripts: CygWin allows you to use shell scripts to automate tasks that simply cannot be done with a Windows batch file.
First of all, many people find that it is easier to automate sophisticated processes using shell scripts than to do so by writing batch files. The control structure for Windows batch files evolved over time in a very haphazard manner, whereas shell scripts have always enjoyed a programming-language-like structure.
Secondly, there’s a huge list of Linux commands that have been converted to run under CygWin. In many cases the Linux command is unique, with no Windows counterpart to speak of. In other cases, there may be a Windows counterpart, but the Linux version is more powerful, or it provides an alternate way to specify the options, or a combination of the two.
Even in cases where the process to be automated could easily be done with a batch file, using a shell script instead means that it will not have to be converted later should the process be moved to a Linux box.
Another big advantage to CygWin is that, since it is free, open-source software, there’s nothing to stop you from running the latest and greatest releases in order to take advantage of its full potential. Compare this to the feature set of Windows batch files which depend on the version of Windows that you are running.

Individual Commands: Here are just a few of some popular commands that run under CygWin:
rsync - Synchronizes two file folders (remotely) so that the files in the target folder are up-to-date with corresponding files in the source folder (fast).
conv - Converts the line endings of text files to/from DOS style and UNIX style.
tidy, catdoc, etc. - Utilities for manipulating text files.
openssh - Generates a private/public key pair for use with SSH security

Graphical Environments: CygWin even supports three different graphical environments out-of-the-box, including KDE and Gnome.

For those of you who cannot wait to get started, the CygWin user guide (http://cygwin.com/cygwin-ug-net/) is good, but terse. It even includes two different getting-started guides: one for people who are more familiar with Windows than UNIX, and one for the other way around.

Basic Commands in Linux

Please refer the following link for basic commands in linux that are to be used in day by day for linux users.

http://ss64.com/bash/

Unix website for Open Source Beginners

Please refer the following site for newbie users,the site includes  linux  commands , linux forums , linux latest distributions ,linux tutorials , linux videos and many more...

http://www.unixmen.com/ 

Tuesday, January 12, 2010

Websites for linux open source

Please refer the following site for linux open source links,

http://www.linuxontop.com/

Monday, January 11, 2010

List of free and open source software packages

http://en.wikipedia.org/wiki/List_of_free_and_open_source_software_packages please check this link for list of website names for free and open source software packages.

What are the Open Source Distributions available in Linux?

The Open Source Linux Distributions available are

*Debian
*Open Suse
*Fedora
*Mandriva
*Ubuntu
*Kubuntu
*Xubuntu
*BOSS(Bharath Operating System Solutions)
*Cent Os

Sunday, January 10, 2010

What is linux?

Linux is a operating system which is open source.Linux can be used on computers(desktops and Laptops) as well as servers.To know more about linux, check with following link
http://en.wikipedia.org/wiki/Linux